I've been looking for an easy, innovative way to fill a skinny patch of wallspace, and today I hit on it: an oversized version of my favorite strip of photos from last year's County Fair.
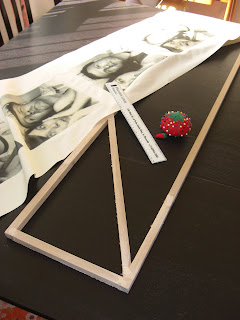
First, I bought some 5/8" square poplar dowels from my local hardware store, with which to make a frame to stretch my canvas. They only came in 36" lengths, so I had to add 8" to the ends to get my desired 44" length.
My mother helped me glue and staple together a 44x10 frame, with crossbars to stablize it. We also puttied the joints, just to make sure the staples didn't create any bumps.
Then I printed my four black and white 8x10 photos on iron-on transfer paper, and cut a 14" wide piece of canvas cloth...
Ironed them on per the instructions on the packaging...
Let them cool...
Stapled the fabric on the frame, and done! Personalized art, perfect for my bedroom! If I had it to do over again, I would probably look for a prefab frame, so I didn't have to go through all the pain of sawing, gluing, stapling, puttying... ugh. My arms ache just thinking about it. But the result is pretty satisfactory, so it was worth the effort.
Sunday, August 9, 2009
Thursday, August 6, 2009
More Desk Organization!
You can't say I didn't warn you! My boss was going to get rid of his Ikea Mackis desktop drawer unit thingy, so of course I snapped it up. This time I left it with the natural finish, and I quite like it.
It's a nice contrast to the white unit, and looks a little less formal. Plus, not painting the inside makes the drawers open a lot more easily!
Labels:
anthropologie,
decorative molding,
desktop,
diy,
drawers,
organization
Sunday, August 2, 2009
Desktop Storage
The first day I arrived at my current job, I was greeted with this blue-washed Ikea drawer unit.
It was a storage solution that I never questioned, until I successfully completed an awesome Design*Sponge tutorial. I loved the outcome so much, I immediately wanted to make over every set of drawers I could get my hands on.
Since the unit was already blue, I couldn't stain and varnish it, the way I did with the last unit. Instead, I painted the whole shebang white, and added simple $6 acrylic drawer pulls for a whole new look.
I think this is a perfectly elegant office storage solution, especially with the added accordion filing system I added to the inside (thanks to tacky glue and craft paper).
Watch out for lots more storage solutions that take advantage of this technique. I just can't get enough!
Saturday, August 1, 2009
Salvaged Chandelier
During a recent rummage mission at St. Vincent de Paul, I came across this diamond-in-the-rough:
Didn't look like much at the time, but after a coat of primer...
Then a hefty dose of blue paint, new cap nuts, and $5 worth of acrylic "crystals" from Michaels, and bada bing!
Not too shabby! All told, it was $20 for the chandelier (talked them down from $30, since I wasn't sure the lamp would work), about $15 for paint, cap nuts, and light blubs, and $5 for the faux crystals. So for about $40, I got to dress up my small hallway with a much needed punch of color and sparkle. And I just can't stop gazing at it!
Subscribe to:
Posts (Atom)