Showing posts with label renovation. Show all posts

Saturday, February 4, 2012

My Friendly Neighborhood Lowe's!

After a year and a half of trying to figure out which Home Depot is less painful to get to from Mid-City (jury is still out, though our most frequented location is Marina del Rey), a gigantic, brand-spanking new Lowe's store has opened about 4 blocks from my house! This is definitely cause for celebration!


You remember that commercial from ages ago, where the woman is tapping on Mervyn's door chanting "open open open"? That was totally me, at Lowe's this morning. I dragged my dad out of bed, and we went to discover the wonder that is a real home improvement store (sorry, OSH) within spitting distance of where you're doing ongoing renovations.

They might have thought I was strange for taking beauty shots of their store, but they were nice enough not to mention anything.


Ooooh yeah, cut that plywood!


Look at all the colors! 

The store did spark some local resentment, as the big cement walls blocked the city views of nearby homes. Believe me, I would have been pissed about that too. But the damage has been done - would it be fair for me to boycott Lowe's now that there is nothing that can be done about it? I think not!

They told me that they're having a special community outreach day next week, with activities and food and discounts - see you all there!

Sunday, July 24, 2011

Kitchen Update: Finally Finished!

The day has come! It's over! The kitchen is finished! Exclamation points for all!!

It was quite the push to the finish, especially since I stupidly invited some people over for a reveal a little later this afternoon (way to give myself a deadline! why didn't I just do it next weekend??). But in reality, it's nice to have something to aim for. If you I don't have a real motivation to wrap things up, projects tend to stretch into the "I'll get around to finishing that eventually" category.

Alright, enough of my jibber-jabber! You want to see the finished product, don't you?! Let's do a before and after!


The craziest part is how clean everything looks, haha! That was no easy feat. But just check out the new sightline through to the rest of the house...


Three weeks ago, that picture would have been of a wall! It's truly an amazing transformation. Now that it's done, I sort of want to do it all over again!


Wednesday, July 20, 2011

Kitchen Update: Subway Tile!

I feel like there have been more exclamation points used in these last few kitchen posts than possibly in this entire blog, combined. But that just goes to show you how excited I am that the finish line is drawing near!

It feels like every piece that gets done, completely transforms the look of the space. The cabinets, the flooring, the counters - each one was more exciting than the next. But now that we're on tile, it's beginning to feel really finished, and that has me using more exclamation points than ever!!

One thing (the only thing) that I was actually sad to rip out of the old kitchen was this luxuriously thick subway tile, on the old backsplash. I considered keeping what I could, and trying to find a match for the rest, but have you ever priced out that vintage tile? They're like $6 a piece!

Instead, I went with the same look for a whole lot less. Home Depot quality subway tile will have to do.


I have no complaints though, I think it looks pretty spiffy! And with a little sweet-talking and eyelash batting (and careful explaining), I managed to get Martin to do a herringbone pattern on the recessed vent hood. It was quite the brain teaser, but he did a bang-up job!


The ceiling plaster is also complete! As you can see in that picture, we left it a little rough and rustic. All the better to hide the cracks and dips, my dear!

We're really on the tail end of things now, projected to be finished by this weekend. I can't even tell you how ready I am to have my house (and my life) back. Not to mention ready to get my fridge out of my living room!

Monday, July 18, 2011

Real Time Kitchen Update

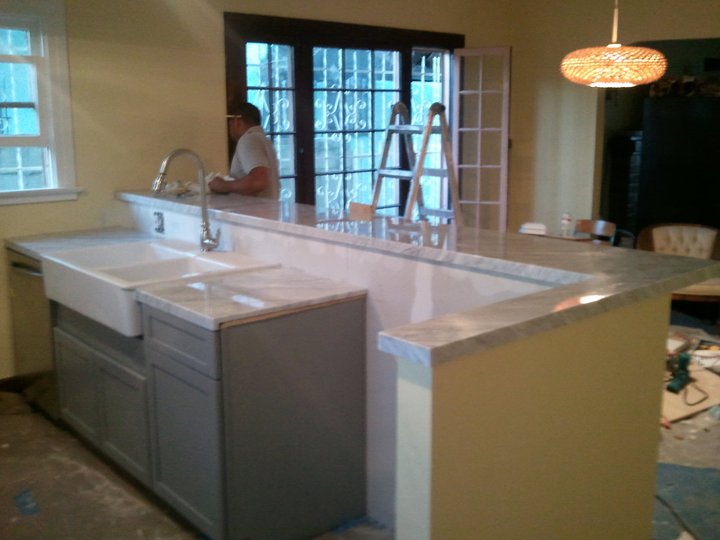
It's all happening! The counters are being installed as I type this very post! How freaking gorgeous does that look??


The sink and dishwasher aren't hooked up yet, they're just there for placement purposes. But I don't even care, seeing that counter go in has made the last few weeks of stress and dwindling bank accounts totally worth it!

Wednesday, July 13, 2011

Kitchen Update: Floor and Lighting

When you're gutting a room and starting over from scratch, there are a lot of decisions that need to be made. It's not just paint colors and cabinet door styles - there are functional considerations in everything you put in a room. For example, take flooring. Most people have tile in their kitchens, which makes sense. It's durable, it's waterproof, and it's relatively inexpensive. What's not to love?

Well, my kitchen is now visually connected to the rest of my house, and I wasn't keen on having such an abrupt flooring. But I also didn't want to put hardwoods in a room that would likely see spills and mops on a regular basis. So after a little research (and a lot of HGTV watching), I settled on cork floors, from Lumber Liquidators. The color is very close to the oak hardwood in the rest of the house, but the texture is different enough that it doesn't look like I tried (and failed) to match the floors.

Plus it was pretty easily to install. Just roll out the underlayment, and click down the tongue-n-groove planks. See how easy my big brother, Monty, makes it look?


Once it's all in, the seams practically disappear into the pattern.


Cork is also supposed to be easier on the feet, and naturally water resistant. Martin was curious, and soaked a piece in a bucket of water to see how it would hold up. It was about 12 hrs before the particle board backing started to swell, but the cork didn't change at all - not too shabby!

My dad has also completed the relocation and installation of the new lighting. I actually bought one of these lamps way back when I lived in the Meganplex, to put in my kitchen there, but the wiring was so decrepit that my dad didn't want to risk shorting anything out by replacing the fixtures. So this sat in a box until it was safely in its new home, and accompanied by a new twin (from Ikea, around $60 for the pair!).


Flooring, lighting, cabinets, all done! Up next, we have a whole lotta tiling to do! Time to get grouty!

Friday, July 8, 2011

Kitchen Update: Cabinets and Counters

Drywall and plaster patching are pretty much finished (except for the ceiling), but today was super exciting because we actually got to hang some cabinets! These things have been collecting dust in the garage for months, and I finally got to see them in my soon-to-be-gorgeous kitchen. Anyone who has ever renovated a kitchen knows what a monumental moment this is. 


Beyond just being excited, we had to jump the gun a little on installation, because the countertop guys are coming tomorrow to measure things. Speaking of countertops, want a sneak preview of what I picked? OF COURSE YOU DO!


After much research and debate, I finally went with Carrera marble for the counters. And I am so glad I did - isn't it gorgeous?! I went to Planet Stone, deep in the valley, for wholesale prices. Of course I've yet to see the final quote, but whatever it is, it'll be worth it. Just looking at those two pictures side-by-side gives me goosebumps. 

Kitchen renos are so fun!


Saturday, July 2, 2011

Kitchen Demo: It's Finally Here!

It's been a whirlwind of activity at the Rosenfeld Cottage the past few days! Demo has officially begun on the kitchen remodel! Check out the before pictures, so I can have your complete sympathy...


Can you believe I ever hosted Pre-Thanksgiving in this kitchen?? Now feast your eyes on the glory that is demolition...


Looks better already, doesn't it? That big old hole in the floor is so that we can run the plumbing over to the other side of the kitchen, for the sink and dishwasher. The crawlspace was too small to fit a person, so we had to go in through the top. Luckily, replacing the floor was already on the menu, so it wasn't too big a deal.

When we pulled down all those weird pressboard ceiling tiles, we uncovered a recessed vent hood in the ceiling! Not only is it a cool piece of character from the original build, but it also saves me a bit of money on buying a new hood (those things are expensive! Who knew?). 


It already feels about ten times bigger than it did. You can see we have some drywall up on the half wall! Things are beginning to take shape!

Friday, February 4, 2011

More Kitchen Planning

The good news: the kitchen renovation has been officially been scheduled! The bad news: it's not till July! Insert "whaa whaa" noise and pouty faces here.  Martin is booked full time in Sacramento until late June, so I just have to learn to be patient, and just keep stockpiling building materials in the garage until he can get down here.

Speaking of which, I ordered my cabinets! And even though it's going to be several weeks until they arrive, I do have some conceptual drawings to share...


That's right friends, we're taking down the wall between the kitchen and the dining room! I know it's going to make such a big difference, it's all I can do to not run home and start sledge-hammering things right now.

Here are a few more views, to get you as pumped as I am.


The biggest change is obviously the half wall, but another major improvement is moving the sink. Currently, it's centered under those two windows. The plan is to move it across the room, so you face into the dining room while washing dishes. Not only is this more social, but it also allows me to get a full-sized sink and dishwasher! You heard me, DISHWASHER! WOOT!

The wall of cabinetry with the two windows is only about 18 inches deep because of that doorway into the laundry room, so it really made way more sense to move things around. 

I can't wait to see this done! I'm thinking of enlarging the schematic and Mod Podging it to the dining room wall, so I can pretend that it already exists. 

Saturday, January 1, 2011

(Almost) Cooking with Gas!

Now that Christmas is comfortably behind us, I am in full planning mode on the kitchen renovation. At this point I'm just sourcing materials, but I never knew how exciting weekend trips to Ikea and Home Depot could be!

I've been buying things as I find them, so that I don't run the risk of them being out of stock (and I can pay things off as I go, instead of a huge bill at the end). Check out the mood board I put together...

I am loving those grey cabinets, but they are surprisingly hard to find. I went to the Kitchen Store in Culver City the other day, and they looked at me like I had two heads when I asked for grey color samples. I said to the guy, "Mark my words, in two years you will be inundated with people asking for grey cabinets!" Turns out it was for the best, because Lowes not only had better prices, but also threw in free hardware and a free kitchen sink cabinet! Cha-ching!

By the way, did you notice the little vintage oven, above? It was a craigslist find for only $300! And it totally works! It's estimated to be about the same age as the house, so I'm totally feeling the synergy.


I can't wait to start knocking down some walls!

Friday, December 3, 2010

A Very Vintage Bathroom

Almost as important as the bedroom, and only slightly more important than the kitchen, is the bathroom. I mean, you need a place to sleep and pee, but you can always go out for meals, right?

Fortunately, the bathroom was actually one of the smaller projects we have undertaken so far. The space is pretty well laid out as is, no need to re-plumb anything. But the fixtures were either dated, or downright nonfunctional. I think the vintage sink is adorable, but it is decidedly impractical to have separate faucets for hot and cold. Especially when the hot doesn't actually work. After 5 weeks of washing my face in cold water, I decided the time had come to do something about it.

Here, again, is the before...


The weirdly short vanity and old-fashioned sink had to go. I had wanted to add subway tile halfway up the walls on all sides, but the plaster was actually so wavy that Martin didn't think he could get a straight grout line to save his life. So we went with wood wainscoting instead. And actually (don't tell Martin), I think I like it even better.

I painted the upper half of the walls Faultline Grey in satin finish, by DutchBoy, and all the wood trim is Silver Lining semi-gloss (which is the color for all the painted trim in the house, and in eggshell for the ceilings).


The sink is American Standard, and the faucet is Kohler. I also replaced all the drawer and door hardware with satin nickel pulls from OSH, which is handily located about two blocks away. I also scraped off the yellowed window film that the old owners had applied for privacy, and replaced it with this awesome product.

I also beefed up the moulding around the medicine cabinet with some more ornate trim. And when I took the medicine cabinet door off to sand it down, I actually found a recessed mirror BEHIND the mirror the old owners applied to the top of the door. WHY? These are the mysteries that will never be solved.

Overall, I wanted a very classic look that could have been original to the house, but would function like a modern bathroom. I think I achieved that, what do you think?

Sunday, October 31, 2010

From Bad to Worse

I know this is not exactly revolutionary information, but I feel the need to point out that buying a house, and renovating it, is a very stressful process. It's expensive, it's hard to plan, and there is an immense amount of pressure to get things done quickly. This was compounded by the fact that my closing date went over by 2 weeks, my carefully planned renovation schedule went out the window, and I was effectively homeless. This is not how things were supposed to go!

As I mentioned in my previous post, there was a fair amount of demo that had to be done before the real work could start. We're concentrating on the bedroom, but we also had to rip out about a third of the kitchen cabinets, just to get a refrigerator into that space. Oh, this is after replacing the electrical panel, and adding outlets to every room (and GFIs in the kitchen and bathroom). This is post-demo...


I know it's horrifying, but it has to get worse before it can get better!

Back in the bedroom, we tore down the ceiling (or, more accurately, we poked the ceiling and it fell down), replaced the broken window panes, and ripped out the carpet in both bedrooms and the hallway. The spare room and the hallway had pretty pristine wood floors underneath, just like in the rest of the house. Jackpot, right? Not quite. For some reason, in the bedroom, the entire floor was covered in some kind of thin green adhesive. It wasn't sticky to the touch, but it sure as hell stuck to the floor. Sanding didn't work, floor scrapers didn't work, soaking didn't work... the only thing we could do was get on our hands and knees and chip it up, bit by bit, with 5-in-1s. This is also the week I learned what a 5-in-1 is.

Little by little, we got it all done. And my bedroom is officially the first "done" room in the house. I readily admit that it's not the most polished design in the world, but with the time constraints and not having the budget to buy multiple new rooms full of furniture, I did what I could with what I had. And actually, it feels like a cheerful little island in a tumultuous sea of sawdust and joint compound.

Remember the "before"?


Here is the very yellow after..


An extra special thank you to the kind friends who are letting me take turns crashing in their spare rooms! Love you guys!

Tuesday, October 12, 2010

Happy House Warming! Er... demoing...

Those of you who know me personally, know how long I searched for a little fixer to call my very own. From South Central to Glendale and beyond, I left no reasonably-priced stone unturned for almost two years. My tireless efforts (and those of my steadfast Realtor) finally bore fruit last month! I am now the proud owner of a two bedroom, one bathroom, 936 sq ft cottage in Mid-City Los Angeles. Hurray for me! Now you KNOW there is work to be done before moving in. What fun would turn-key be? Check out the pics from the listing...


Not too terrible right? Well did you happen to notice there are some rooms missing? How about a kitchen, a bathroom, and maybe a bedroom or two? Here are some pics I took on the final walk through...

Unfortunately, I didn't get one without my dad standing right in the middle of the kitchen (look how distraught he looks. You can basically see him asking me, "what have you done?!"). But you can tell: a) there is NOT a lot of space b) it's basically been untouched since 1925 c) this is going to be expensive. What you CAN'T see in the pic, is that there is no refrigerator, nor is there room for one. Lord knows where the last owner put theirs, I'm guessing on the back porch. Keepin' it classy.


What a cute little bathroom, right? I don't know what I like better, the makeshift vanity that someone cobbled together from random pieces of particle board, or the electric that is run on the outside of the wall, conveniently next to a water source. Fun times! Still, this room has major potential and you have to love the original hexagon porcelain tile floor.


This is the master bedroom, measuring 11.5 x 11.5 feet. Not the Taj Mahal, but not terrible either. What you can't see from the picture, is that the popcorn ceiling is actually falling down. We tried to break off a little piece to get it tested for asbestos, and basically ended up with a whole-lotta ceiling on our heads. And yes, that carpeting is going to go, post haste. The bedroom will be my first project, as I can't (or won't) move in until I have a safe, sane place to sleep -- without a Chicken Little ceiling and vintage Mid-Century carpeting. Did you hear that bullhorn? Let the reno begin!