Monday, October 12, 2009

Befores

I've had some good luck junking in the last few weeks! Check out these two little diamonds in the rough that people had left out for the garbage collector:


And this little beauty was only $15 at a local flea market:


As my place gets more and more packed with "projects" I am beginning to feel a little bit like one of TLC's Hoarders. So I might have to put these items up for sale in the shop once they're done. Keep an eye out for the "Afters" post!

Easy Candles

Is anyone else sick of using tea lights for ambiance? They burn out so darn quickly! How about a really simple, reusable, and decorative alternative?

For this project, all you need are some jars (I used spice jars from Ikea, only $2.99 for a 4 pack), melting wax (soy wax is said to burn cleaner than paraffin wax), wicks (try to get them without the wire), and a little tacky glue.


The instructions on the wax said to use some special kind of tacky wax to stick the metal plate of the wick in the jar. I didn't have any, so I used tacky glue, and it seems to work out pretty well. Just make sure the glue is dry before you pour in the hot wax.

You can melt the wax 30 seconds at a time in the microwave, but doing this tripped the 1939 electrical circuit in my duplex, so I had to resort to the old-fashioned method - melting on the stove top. Don't put the wax directly in your saucepan, use a double broiler method instead.


When the wax is clear, without any chunks, pour it carefully into your jar, avoiding the wick. It will turn opaque as it cools.


When you're done, you'll have a tidy little set of spice jar candles, which you can keep refilling with new wicks and wax as needed.


I am thinking of tying wire around the top lip of the jars, and using them as hanging candles outside.

Sunday, August 9, 2009

Gigantic Photo Strip!

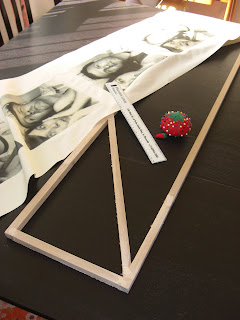
I've been looking for an easy, innovative way to fill a skinny patch of wallspace, and today I hit on it: an oversized version of my favorite strip of photos from last year's County Fair.

First, I bought some 5/8" square poplar dowels from my local hardware store, with which to make a frame to stretch my canvas. They only came in 36" lengths, so I had to add 8" to the ends to get my desired 44" length.


My mother helped me glue and staple together a 44x10 frame, with crossbars to stablize it. We also puttied the joints, just to make sure the staples didn't create any bumps.


Then I printed my four black and white 8x10 photos on iron-on transfer paper, and cut a 14" wide piece of canvas cloth...


Ironed them on per the instructions on the packaging...


Let them cool...


Stapled the fabric on the frame, and done! Personalized art, perfect for my bedroom! If I had it to do over again, I would probably look for a prefab frame, so I didn't have to go through all the pain of sawing, gluing, stapling, puttying... ugh. My arms ache just thinking about it. But the result is pretty satisfactory, so it was worth the effort.

Thursday, August 6, 2009

More Desk Organization!

You can't say I didn't warn you! My boss was going to get rid of his Ikea Mackis desktop drawer unit thingy, so of course I snapped it up. This time I left it with the natural finish, and I quite like it.


It's a nice contrast to the white unit, and looks a little less formal. Plus, not painting the inside makes the drawers open a lot more easily!

Sunday, August 2, 2009

Desktop Storage

The first day I arrived at my current job, I was greeted with this blue-washed Ikea drawer unit.


It was a storage solution that I never questioned, until I successfully completed an awesome Design*Sponge tutorial. I loved the outcome so much, I immediately wanted to make over every set of drawers I could get my hands on.

Since the unit was already blue, I couldn't stain and varnish it, the way I did with the last unit. Instead, I painted the whole shebang white, and added simple $6 acrylic drawer pulls for a whole new look.


I think this is a perfectly elegant office storage solution, especially with the added accordion filing system I added to the inside (thanks to tacky glue and craft paper).


Watch out for lots more storage solutions that take advantage of this technique. I just can't get enough!

Saturday, August 1, 2009

Salvaged Chandelier

During a recent rummage mission at St. Vincent de Paul, I came across this diamond-in-the-rough:


Didn't look like much at the time, but after a coat of primer...


Then a hefty dose of blue paint, new cap nuts, and $5 worth of acrylic "crystals" from Michaels, and bada bing!


Not too shabby! All told, it was $20 for the chandelier (talked them down from $30, since I wasn't sure the lamp would work), about $15 for paint, cap nuts, and light blubs, and $5 for the faux crystals. So for about $40, I got to dress up my small hallway with a much needed punch of color and sparkle. And I just can't stop gazing at it!

Wednesday, July 15, 2009

Anthropologie Hack

Design*Sponge recently posted a tutorial for a diy version of Anthropologie's (ridiculously overpriced) Curator Table, and I immediately fell in love with it. I do have to admit, though, that I was pretty convinced that I could do better than the venerable Britt, when it came time to emulate her tables - not to deny her just desserts... she had the idea, I was just capitalizing on it. And I also had a miter saw, which she was apparently lacking.

Britt's table:


My table:


Really not that different, I just continued the trim all the way around the top and bottom of the table, and stained instead of painted. One word of advice though: make sure you line the molding up, so that it doesn't overlap with the drawer above or below it. Makes for a pretty difficult time opening the drawers. :/

Friday, June 12, 2009

Fun with Mod Podge!

This photo I took at Luna Park in Syndney Harbour always evokes a warm fuzzy feeling in me, possibly having something to do with fond memories of my sweet nephew. But I've never been sure of how best to display it. Of course, when life hands you a dilemma, the answer is usually Mod Podge.


The supplies:
- Painter's canvas (I chose 4"x5" with 1 1/2" strechers)
- An image printed centered, with enough of a border to wrap fully around the edges
- Scissors for the cuttin'
- Mod Podge for the stickin'
- A foam brush for the applyin'


I put on a pretty thick coat of the 'Podge for the initial stick, then put the whole thing under a phone book for about 20 minutes in hopes that it would dry flat. That never really works, and I don't know why. Maybe it needs to sit longer? I'm sort of too impatient for that.

After the painful anticipation of waiting 20 minutes, I slapped on a couple of top coats and let the thing sit overnight. Magically, it dried perfectly flat, and awesome-looking:

The final product:


Kind of looks like a real painting on canvas. Cool!

Dover Sampler Platter, please!

Have you signed up for your free Dover sampler yet? WHY NOT?

They send you a newsletter every Friday with free scans from all kinds of different art books. Lots of vintage labels, advertisements, sketches, I even downloaded an Elvis paper doll (complete with change of rhinestone jumpsuit).

I also framed this little lovely for my bedroom wall:


So go sign up! You won't regret it!

Craft Night: Owls!

Last night was the first craft night in a few weeks... well, the first craft night where we actually make things. Lately it's been our intention to craft, but we somehow devolve into eating hot Krispy Kremes while singing along to mid-nineties Christian Bale musicals, followed by a long nap.

Aaaaanyway, this tutorial from Moonstiches (via Indiefixx) was too good to snooze through. Once you figure out the pattern (Moonstiches doesn't provide it, out of respect for something called "copyright infringement." But I say infringement, schminfringement... ripping off patterns is why God made interns -- thanks Jane!), it's really just a few easy steps to full adorability.


My owl is on the right, Lisa's is on the left. I love hers, he totally reminds me of the Tootsie Roll pop owl.

Friday, May 8, 2009

Nightstand Before & After

Okay, don't judge me too harshly, as I bought this bedroom set more than 10 yrs ago. Rattan was big back then! It was from Pier One! The height of sophistication!

Before: A rattan monstrosity


After: A decoupage dream!


The hardest part of this project was prying off that darn rattan -- each piece was individually stapled down! But once I got it all off, all I had to do was cut pieces of fabric about an inch and a half bigger than the drawer fronts, and apply them with (what else?) Mod Podge. Then sand, prime, and paint the rest of the nightstand with white flat paint. Once that was dry, I decoupaged the fabric on to the top and side panels. After adding a couple of pretty drawer pulls (from Anthropologie, naturally), and a piece of custom-cut plexi for the top, I was done!

Looking back, I would have used a semi gloss paint for the night stand. It makes dusting so much easier (not that I do a lot of dusting, mind you). But overall, I love the splash of color this lends to my bedroom. Next project: making over the matching dresser!

Monday, May 4, 2009

Buttercup Purse

I love purses, I love free, and I love to sew. Lucky for me, Made by Rae has combined my three favorite things by offering this free purse pattern! Woot!


Not feeling like trekking all the way to Joanns to get a magnetic snap, I deviated a bit and used a botton loop closure. I think it works fine, and allows me a little more room on the inside for putting my phone in the interior pocket. I also vetoed the bulky strap included in the pattern. So far it's working as a clutch, but I might add a different type of strap sometime soon. The pattern and tutorial are pretty easy to follow too!

I think it's a pretty cute little spring / summer lightweight clutch, and I am considering enlarging the pattern to make a tote bag. I also think it could be made smaller, and modified to include a zipper, to be used as a cosmetic bag. How multi-functional! Love!

Chair Makeover

As I was walking my dog last November, I came across this little beauty sitting on the street corner. Don't worry, it had only been out there a few minutes before I snagged it (not long enough for the hobos to pee on it).


I had been hankering to try a tailored slipcover like the kind they're always making on Trading Spaces, and this free chair was the perfect way to break in my new staple gun. A few yards of Lena fabric from Ikea, and some high gloss brown paint for the legs, and I was in business!

Mimicking what I had seen on TV, I cut largish pieces of fabric, and pinned them directly to the chair. Then I put pins all along where the seams were in the current design. The curved back created some difficulties that I had to improvise around, and fitting the cover back on the chair after it had been sewn was a bit of a problem. Since the top of the chair is wider than the base, I ended up hand-sewing the final seam to make it fit. Overall, the process was trial by error, but I think the results are pretty satisfactory!


Right?

Saturday, May 2, 2009

Herb Garden

As I was cruising the dollar bin at Target last night (yes, it was a Rockin' Friday Eve), I spotted cute little ready-to-pot herb kits. I bought three: oregano, sweet basil, and chives. Though I have a brown thumb and kill every plant I get near, I have high hopes for these. They've been easy so far!

Just soak the soil pellet in 1/6 cup lukewarm water and watch it expand before your very eyes! Mash it up with a fork, and transfer it to the pot. The instructions that came with the kit said to only plant ten seeds. I did that with the chives and basil, but the oregano seeds were so darn tiny I added a few more... maybe this is why I kill everything.


After potting I added some simple little signs cut from card stock and mounted with a bamboo skewer. Part of me was afraid I wouldn't recognize the herbs after they'd grown in... did I mention I am not exactly a gourmet chef?


Still, they're cute in my kitchen window sill.

Decoupage Birdhouse

Spring is here! Every morning I am greeted by two little sparrows tapping on my window, and I can't help but think they are asking to come in for breakfast (little do they know the content of my fridge consists of Tim Tams and expired condiments). So, I thought I would give them a dedicated space of their own.

I simply painted the outside of the birdhouse brown and blue, then did the inside in a contrasting red. Once everything was dry, I used several coats of my old standby, Mod Podge, to apply the craft paper flowers to the roof. Since the house is going to be out in the elements, I sealed everything (including the inside) with an all-purpose sealer.

Michaels has a wide assortment of unfinished birdhouses that you can do up to suit your own purposes.


By the way, I found out after completing this project that there are different kinds of houses for different types of birds. It's quite possible that the Michaels birdhouses were never intended for actual bird use. If you want to investigate before buying, check out this site for tips and guidelines.

Friday, April 24, 2009

Tile Coasters

It's craft night again! This time we're making tile coasters, inspired by Curbly.com. They used paper napkins, which may or may not have proved easier than using stiff craft paper, as we did. But it is hard to imagine anything being easier than this simple craft.

Just cut squares of your paper to the size of your tile (available at your local hardware store for about 14 cents each), and apply with Mod Podge. Now, this part is important: before putting on your top coat of Mod Podge, put your coasters under something heavy (the phone book works great -- it's basically the only reason I haven't recycled it yet) and let them dry thoroughly.

Once they're dry and free of bubbles, apply top coats of the Podge, letting it dry in between. Then add a felt footy to each corner of the underside of the tile, and you're done! Now I have six coordinating coasters that can also double as trivets in a pinch. Neat!

Friday, April 17, 2009

Marble Magnets

Last night was craft night! I try to pick crafts for this weekly event that aren't too pricey, and can be completed in only a few hours (while watching a movie and eating popcorn and Junior Mints). This week's project was culled from one of my favorite blogs, How About Orange.

Here's what we used:


I used scraps of craft paper I had left over from other projects, but really any paper would work. And here's a tip: get the marbles from the floral section, not the mosaic section, of your local craft store. You'll get about 5 times more marbles, for the same price.

This project really couldn't be easier. Cut out your paper to the size of the magnet (not the marble), and glue it to the marble. I used a generous amount of Tacky Glue. Whatever you're using, make sure it dries clear. And check on your marbles throughout the process, as they tend to slip around before the glue sets.

Once that's dry, glue the paper side of the marble to the magnet. Allow that to dry thoroughly, and you're done!

Friday, April 10, 2009

Ikea Clock Makeover

I spotted this tutorial on Design*Sponge and immediately thought it would make an adorable kitchen clock. Plus, the clock was two bucks at Ikea -- a craft project AND a good bargain? How could I resist?

I did take the liberty of simplifying their project even further. Instead of fabric and embroidery, I used a nice thick craft paper and traced on some medieval-style numbers from this free clipart library (my laptop makes a great lightbox). Lastly, I painted the second hand to match the newly painted clock frame, and voila! A kitschy clock is born!